Customizing the Header
The default setting for your self-services header is to have your logo or department signature system centered over the navigation. This layout allows for maximum flexibility of your navigation, and minimizes interference from and spacing issues with your logo. Colors and menu style have been set by default and are designed to follow the University Brand Standards
Option 1: Display your website name where it says “UChicago Voices Template”
![]()
Option 2. Replace “UChicago” wordmark with your unit or department logo.
![]()
Editing the Logo
In order to replace the logo at the top of the screen, go to your Dashboard and select Divi > Theme Options > General > Logo. Once you have uploaded a new logo, remember to Save Changes. It is recommended you use an SVG file format as this will allow your image to be scaled up and down with no loss of image quality.
Editing the Footer
The footer in this template has been designed in line with the UChicago brand guidelines. It consists of four columns. The first column contains the UChicago Logo by default. The address, phone, and email can be edited by going to Divi > Theme Customizer > Site Information. Placeholder information will display by default, so changing that information is highly recommended. If you have more than two lines that need to fit on an Address Line 1 or Address Line 2, use a
between each line. If you would prefer to not include any of this information, simply delete the default information and put a space in place of the information.
Columns two, three, and four are open for your discretion. Footer Menu 1 and Footer Menu 2 are included by default, but can be edited by going to Divi > Theme Customizer > Menus and Divi > Theme Customizer > Widgets. Again, remember to Save and Publish when you have finished.
Editing Site Name
The name of your site can be edited by navigating to your blog’s Dashboard, clicking Divi > Theme Customizer > General Settings > Site Identity, and then filling in the entry “Site Title.” A tagline and site icon that would both appear in the browser tab may also be added if so desired.
Adding Users
To grant access to individuals, have them go to voices.uchicago.edu and click "log in" from the navigation. This will register their CNet ID to the platform, which will allow them to be added as a user of a site.
Then go to your site’s Dashboard > Users > Add New. Under Add Existing User, enter the individuals’ CNetID or CNet email (cnetid@uchicago.edu).
Note: Do not use Add New Users, or a different email address, such as xxxx@bsd.uchicago.edu, as users will not be able to log-in with their CNetID and password.)
View a comparison chart of the 5 possible roles.
How to Create Pages
To create a New Page, go to the Pages link in your Dashboard and select Add New. On the right side of the editor page there is a column entitled Page Attributes. If you are creating a stand- alone page, select No Parent and the Default Template. If you would like your new page to be nested beneath another page, you can select a parent page. (Page hierarchy can also be edited after creating the page through the Menu link in your Dashboard).
The main difference between pages is how you choose to design them and what modules you include. For a static page, you will include modules with stable content. You may also include feeds to changing content, such as a Twitter or Blog feed. However, setting up a Blog Page is slightly different.
To create a Blog Page, insert a Blog Module into a static page. You can customize your Blog Feed by editing the module (e.g., number of posts per page, post visibility, comment restrictions, etc.). There is also a separate Posts link in the Dashboard where you can manage all of the posts in your Blog Feed. Any new blog post made to your site will feed into the Blog Modules on your site. Additionally, you may want to include a Sidebar Module in your Blog Page, which includes features such as a search bar, blog archive, tags and categories, etc. You can see an example of a Blog Page by visiting the News Page.
How to Copy or Clone Pages
If you’d like to create a copy or clone of a page, go to the Pages link in your Dashboard where you will see a list of all site pages. Hover over the page you’d like to copy and select the Clone option. The new page will appear in your Pages menu as page name – draft, for example: Basic Page – draft.

Creating and Editing Menus
The menu at the top of your site allows visitors to navigate to the pages on your site that you have added to the menu. It is recommended that top level navigation be five items or less (depending on the length of the navigation item). To add pages to your navigation go to Appearance > Menu, and select Homepage (Primary Menu) from the Select a Menu to Edit option and click Select.
Select the pages you wish to add to the menu from the Pages section on the left. Once the pages are added, reorder them under the Menu Structure and then Save Menu. You can create Subpages which will appear in a drop-down menu from your main navigation pages by dragging pages underneath and to the right of parent pages in this menu. They will then read “Sub-item.”
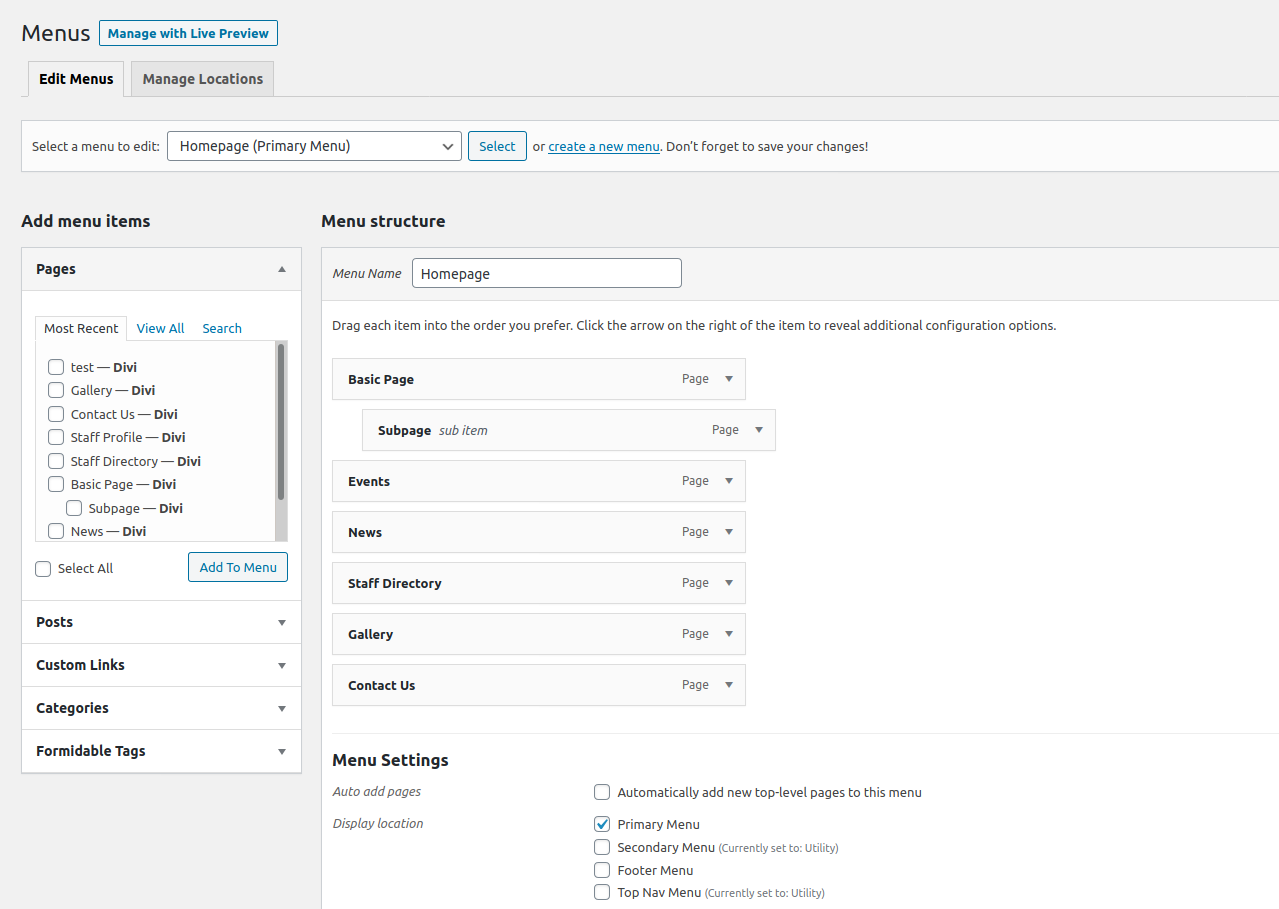
In order to remove pages from the menu, go to the Menu Structure window, click on the page you wish to remove (by clicking on the down arrow to the right), and select Remove. Remember to save any changes you make to the menu by clicking the button at the top right of the interface.
There can be up to three layers of navigation on your site, but you should not have more than two menus directly on top of one another. To create a secondary menu, go to the Dashboard, then select Appearance > Customize > Menus > Add Menu. You will be able to choose whether your menu appears on the top or bottom of the page.
To create a utility navigation in the top right corner of the site, go to your Dashboard and select Appearance > Menus. Next to Select a Menu to Edit, choose Utility (Secondary Menu). Use the Pages and Custom Links tabs to create or add navigation to your menu.
Drop-down Navigation
You can change settings for drop-down navigation under Divi > Theme Options > Navigation. Drop-down functionality is enabled by default, but can be turned off. Learn how to change the main menu options here. You can also disable the main menu items as links. Note that the Number of Drop-down Tiers Shown option allows you to control how many tiers there are in your pages’ drop-down menu. Increasing the number allows for additional menu items to be shown.
Using Tags and Categories in Blog Feeds
The easiest way to add tags and categories to a blog post is in the Dashboard. Go to Posts, select a post, and look at the menus on the right of the screen. You will see sections for Categories and Tags in which you can type in the categories and tags you prefer. If you are using a category for the first time, you will need to Add New Category. If you have included a Sidebar in your Blog Page, these categories and tags will appear there and allow page viewers to navigate your Blog Page for specific content.
If you choose to create a Blog Feed from your central Blog on another page (for example a News feed in your Homepage), you can choose to feed all posts, or only posts within specific categories.
Making Your Site Live
To launch your site, go to Settings > Reading > Site Visibility and select Allow Search Engines to Index This Site.